Pages

Thursday, April 25, 2024

Easy Ribbon Butterfly

Happy (almost) Mother's Day!

Here's a quick and easy ribbon and bead butterfly that you can make for your Mom, grandmother or for a spring decoration. Hang it in a flower pot, add a pin back or adhere it to a tag or card.


Here are the steps to make your own. You'll need:

Grosgrain ribbon, 6" and 5" pieces from Gwen Studios

Chenille stem, 1/2

Pony beads, 5 for body color, 1 for head

Acrylic beads, 2

Sewing thread and needle or tacky glue

Hot glue and glue gun


Cut two pieces of ribbon, 6" and 5".  Curve the ribbon ends to the back center as shown and glue or tack them together.  Trim ends even.


Overlap top and bottom wings and glue.


Fold 1/2 chenille stem in half.  Slide 5 pony beads onto one side of the stem.  This will be the top of the body.


Slide the butterfly in between the folded chenille stem. Glue if desired (it will stay in place without.)


Slide one more bead over both ends of the folded stem. Twist the stems together above the bead. 


Trim the ends and add a small bead to each end.


More ideas:
Use any colors you wish.  Try it with wider ribbon.
Use craft wire instead of a chenille stem.  If you use craft wire, use beads with smaller holes for the body and head.

Look for all the beautiful colors of Gwen Studios ribbon at Walmart, Michaels, Joann's or Amazon.  Try a pack of mixed colors like this pack from Walmart.


For more ribbon ideas, check out the Designer Crafts Connection!


As a member of the Gwen Studios Design Team, I receive samples of ribbons from them for use in my designs.  As a designer who has used many brands of ribbon, I highly recommend them.  


Tuesday, March 26, 2024

Ribbon Garden Flag

 Happy Spring!

It's Spring and time to start planting flowers and decorating the garden. What better way than to create a ribbon flag to catch the breezes.

Here's the Ribbon Flag I created for my garden.


This is such an easy craft that everyone in the family will have fun making it.


You'll need:

Bamboo dowel - 12"

Cut lengths of ribbon (2 each of 16", 18", 20" and 22" and one 24")

Pony beads in multiple colors

String or twine 

Scissors


Instructions:

Tie the longest ribbon onto the dowel with an overhand knot.  Tie the next lengths on either side of the middle.  Repeat for the remaining ribbons.

Trim the ribbons to points. Slide a pony bead on each ribbon.  Tie a knot under the bead if you like.

Tie a string on either side of the ribbons.

Hang in your garden! 


I used Gwen Studios 3/8" polka dot grosgrain ribbon.  The colors are so bright and cheerful! You can find them at Walmart.


Look for more ribbon crafts for Spring and Easter on the Designer Crafts Connection!

Tuesday, February 27, 2024

Ribbon Flower Pin

 Hi Everyone!

It's beginning to look like Spring here. It's lovely after all the rain we've had here in Sonoma County.

In celebration of Spring, I've made a Ribbon Flower Pin. 

 It's quick.  It's easy.  And, you can use any color ribbon or type you like. Of course, I'm using Gwen Studios ribbon.  For color and quality, you can't beat it!


Here's what you'll need to make a flower like mine:

15" of 1 1/2" wide grosgrain ribbon (flower color)

5" of 3/8" wide grosgrain ribbon (center color)

10" of 5/8" wide grosgrain ribbon in green

Tools: scissors, needle and thread, hot glue and glue gun

Instructions:

To start, I've used a wide grosgrain ribbon (1 1/2").  I used 15" of ribbon, but you can make it smaller or larger.

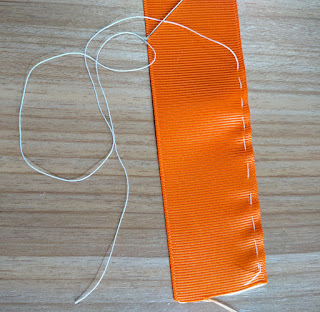
Begin by sewing a running stitch along one edge of the ribbon.


Pull up the thread to gather the ribbon and make a couple of small stitches to hold.


Fold the raw ends of the ribbon to the back and tack with thread or hot glue.  Arrange the flower into circle and glue or tack. 

Fold a 5" piece of 3/8" ribbon into pleats tacking with needle and thread as you go or glue.  This will be the center of the flower.


Glue this into the center of the flower.

For the leaves, cut two 5" pieces of green grosgrain ribbon (5/8").  Cross ends over to create the leaf.


Glue or tack the ends together and glue to underside of flower.  

Glue a circle of felt to the back of the flower and adhere the pin back.


Easy, right?  Of course, you could add this to a headband or hair clip instead of making a pin.  Or, use satin ribbon or organza ribbon.  So many possibilities!  What will you do with this easy flower?

Look for Gwen Studios ribbon at your favorite craft store (like Joann's or Michaels), at Walmart and on Amazon.

Find more great Spring ribbon ideas on the Designer Crafts Connection.


Disclaimer:  I'm a member of the Gwen Studios Design Team and receive samples of ribbon and other items as part of my compensation.  


Saturday, February 24, 2024

Vintage Impressions Jewelry

 Hi everyone!

As I was browsing through some of my jewelry samples from a past book, I decided to search for the book itself.  Surprisingly, it's still out there in a variety of different places - mostly used bookstores.


Here's one that I found interesting at All Free Jewelry:

Vintage Impressions Jewelry | AllFreeJewelryMaking.com

It's a nice review of the book and they are offering a giveaway.  Scroll down to the bottom of the article.  

Tuesday, February 6, 2024

Door Hangers for Kids

Hi Everyone!

Herrschners has published a few more of my designs and they are available now on their website. These are cute door hangers for the kids' rooms.

Here's the girls' room set with butterflies in two styles. 


Spread Your Wings Door Hangers


The boys' set has a nautical theme:


Little Man Cave Door Hangers


Look for these on the Herrschners website under the Plastic Canvas kits.

Thursday, January 25, 2024

Patchwork Hearts with Gwen Studios Ribbon

 Hi Everyone!

Patchwork hearts are fun to create and they are perfect for Valentine's Day. You can use up some scraps from your stash and add some Sweet Shop Ribbon from Gwen Studios


Here is the first heart I created:


I liked it so much; I made another one!

Patchwork Heart with Gwen Studios Ribbon


Sweet Shop Ribbon


The Sweet Shop Ribbons are great additions to a patchwork heart.  There are sweets - cupcakes, donuts, macarons - and lots of bright colors with some word ribbons also. The above link is a set from Walmart, but you can also find these ribbons at Joann's, Michaels and on Amazon.

For this project you will need:

Heart pattern of your choice (mine is about 6" by 6")

Fabric scraps

Gwen Studios Sweet Shop Ribbon (see links above)

Sewing thread and machine or needle (or, fabric glue)

Fabric backing for the heart pattern 

Felt backing for the heart

Instructions:

1. Cut out a fabric heart for backing.


2. Collect fabric scraps to fit across the width of the heart.  Cut or tear into strips or piece the strips if you have smaller pieces.


3. Place a strip right side up across the heart (straight across or angled) so that the strip of fabric overlaps the heart.  Place the second strip right sides together over the first strip aligning the edges. Sew a 1/4" seam. Iron or press the piece to the right side. Repeat until the heart is covered.


4. Press and pin the edges.  Trim from the back to the edge of the heart.

5.  Place ribbons over the patchwork heart and sew along the edges. Cut a piece of felt for backing that is the approximate shape of the heart and pin.  The excess will be trimmed away.


6. Sew 1/4" from the edge of the heart.  Leave an opening at the top to insert a ribbon loop. Pink the edges, insert the loop and sew the opening.


Other ideas to try:

Use fabric glue instead of machine stitching.

Use hand-stitching.

Make a bunch and hang them as a garland.

Add an embroidered name or word and give it to a friend.

Add some batting and make it a potholder.  

Add button or small flowers or a bow.

Have fun creating your own version of a patchwork heart!

And, for more "lovely" Valentine's Day ribbon ideas, see the Designer Crafts Connection blog.


This post features Gwen Studios ribbon.  Since I am a member of the Design Team, I receive samples of their beautiful ribbon.  Look for them in your favorite fabric or craft store!


Thursday, January 11, 2024

Bunny Surprise Tissue Cover and Coasters

 Hi Crafters!

I know it's early but if you want to get a head start on Easter stitching, here's a couple of kits for you.  These are my designs for Herrschners available on their website. There's a tissue cover and coasters.


Look for these on the Herrschners website under plastic canvas.  Here's a quick link.